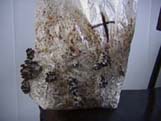
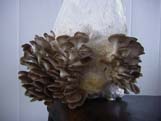
The Oyster mushroom kit we ship is made up of hardwood chips/ sawdust, organic wheat bran and a small quantity of agricultural gypsum. It is totally chemical and additive free. The block will be totally white from the mycelium which has grown through the chips/sawdust mix. This mycelium is your mushroom organism and with the proper care and stimuli it will produce the “fruits” or mushrooms. The kit includes a perforated plastic bag and bamboo skewers which will be used to set the kit up for production.
To provide the stimuli necessary for mushroom “fruiting” follow these steps:
- Leave the kit in its original bag, undisturbed, at room temperature, for 2-3 days to recover from shipping. With a sharp knife make a series of X incisions all around the bag that the kit is in, approximately 2/3 of the way up the sides, 6 to 8 cuts will suffice. The X cuts should be roughly 2.5cm (1 inch) across. These cuts will allow the mushrooms to come out where the cuts have been made.
- This kit must be kept in a high humidity environment (75-85% RH). This can be achieved by using the perforated bag and the wooden dowels as per the drawing. Insert the skewers into the block in an arrangement that will hold the perforated bag in a tent-like position over the block. The skewers should be inserted about 1-2 inches into the block, two on the top and the other 4 around the top perimeter at a slight angle out. It is important to arrange the skewers so that the bag does not touch the block. Place the block with the skewers in the perforated bag so that the bag forms a tent over the block. To keep the humidity high you should mist the block with water at least a couple of times per day. Place the kit on a tray or pie plate large enough to protect the surface of the table or floor because water will condense on the inside of the bag and drip down. Please note that the block of mycelium needs to “breathe” and the perforations in the bag will allow an exchange of gases. The mushrooms require some light, but not direct sunlight as it is too strong. A shady corner, or a florescent light will provide adequate light. The optimum temperature range for the kit is 18-23°C (50-75°F).
 Small “bumps’ should start to form on the block through the X cuts in 1-2 weeks. Once the mushrooms start to form they should not be wet or they will rot. At this point it is advisable to direct the mist around the inside of the bag rather than directly onto the mushrooms. This will facilitate a high humidity environment while avoiding wet/soaked mushrooms.
- Continue with this misting procedure until the mushrooms are ready to pick.
 After the first crop replace the block in its “tent” and let it rest for about 2 weeks. This resting period gives the mycelium a chance to digest more wood and build up its energy for the next “flush”. Do not mist during this period.
- For a second flush of mushrooms, remove the plastic bag that the kit came in completely from the block. Soak the block overnight in cold water (do not use chlorinated water, but if you have to, let the water stand for a few days to dissipate the chlorine) by placing the block in a bucket or sink with a weight on top to hold it underwater as the block tends to float. Replace the kit in its “tent” and start the misting procedure over again.
- In order to initiate more “flushes” following the resting periods re-soak the block and start over as per step 5. You can repeat the above procedure until all the nutrients have been used up and no more mushrooms form.
- After the kit is finished you can break it up. It makes an excellent soil conditioner for your potted plants.
